Submitted by Fred Straker on
Sometimes the best ringtones are those that have been recorded directly on the iPhone. What's better than a unique, homemade ringtone that also costs nothing to add to your device? Since the stock iOS audio recording app is Voice Memos, here are instructions on how to convert a voice memo recording into a ringtone.
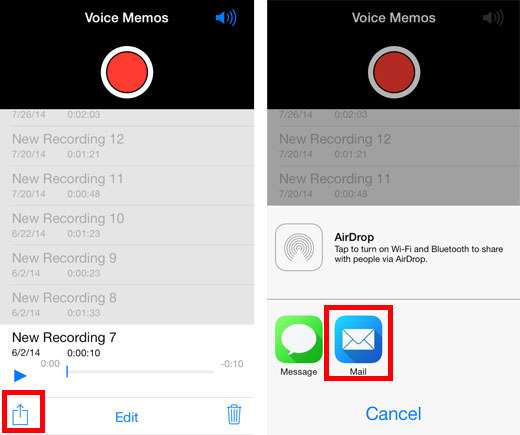
Start by recording the voice memo you wish to convert to a ringtone. Limit the voice memo to a length of 40 seconds or less, otherwise iTunes will not sync this ringtone to the iPhone. Once you have selected the voice memo, tap the share button in the lower left corner. Email the voice memo to yourself, so the file can easily be transferred to a computer.
After the voice memo file has been emailed, follow these steps to convert the track into an iPhone ringtone:
- Download the voice memo from your email to your computer.
- Rename the file extension from .m4a to .m4r and confirm this change if prompted by the computer.
- Plug your iPhone into the computer via USB cable, and allow the device to trust the computer.
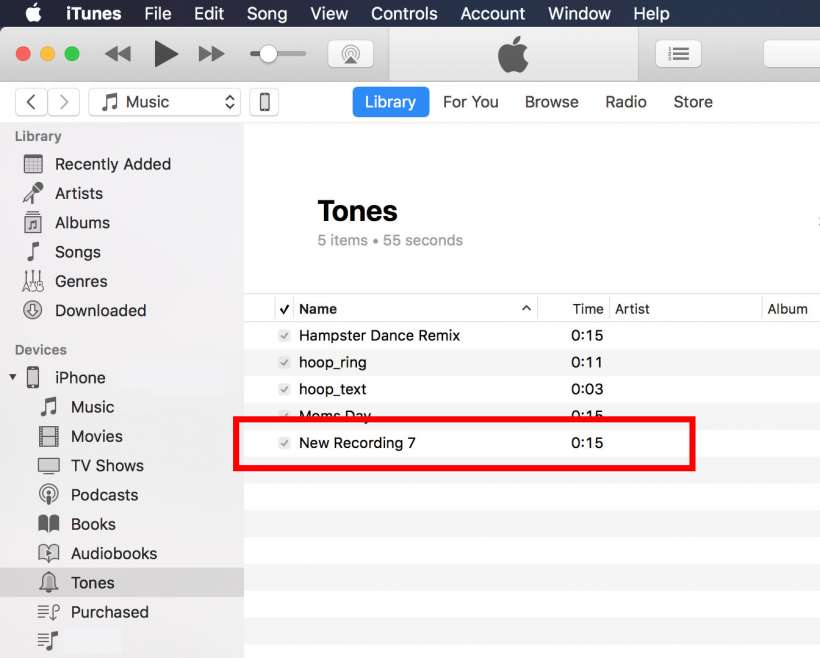
- Open iTunes, then navigate to Devices -> Your iPhone -> Tones
- Drag and drop the voice memo file into the Tones library on your device.
- Once imported to iTunes, the voice memo will appear under Tones. You can preview the tone by playing it in iTunes.
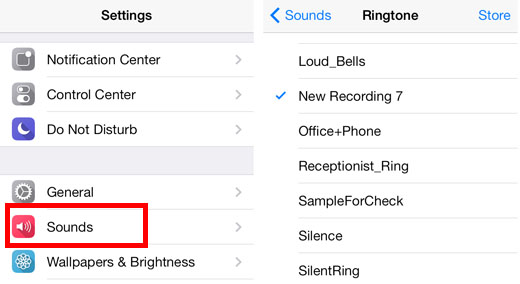
- To use the new ringtone, navigate to Settings -> Sounds -> Ringtone on your device.
- The voice memo you converted will appear in the list. Choose the voice memo to use it as your ringtone.


Any audio recording created with the Voice Memo app can be converted into a ringtone using these steps. Note that carriers will limit the number of seconds that an iPhone rings. In most cases, the ringtone will stop playing long before the 40 second limit enforced by iTunes is actually reached.

Comments
Rajeev replied on Permalink
Worked for me. Thanks for the clear instructions!
Anonymous replied on Permalink
For newer versions of windows you will need to change the view settings for the folder before you can change the file extension. Windows 10 = Click view-check box "show file extensions". Then your file names will show the extension and you can edit it from m4a to m4r.
Anonymous replied on Permalink
This has worked for me in the past (changing the file extension name and whatnot) but it does not import into iTunes...anyone know if there is any changes in the most recent version of iTunes that would cause this?
Anantshiv replied on Permalink
The issue is that Windows 10 is default to not showing you the file extension in the name. You have to go to File Explorer (click on the windows button in bottom left corner next to cortana) and then click on "view". You will see an option to display the File Extension in File name. Check that and then the file extension shows up in the file name. Then go ahead and right click on your file name and change it to .m4r and delete .m4a.
AD4GC replied on Permalink
Worked perfectly after figuring out to change the "save as" option to "All Files" instead of .m4a and then save it as "recording.m4r". Worked flawlessly! Thanks for the info.
Anonymous replied on Permalink
I don't know why this is so complicated! It shld. Be shared directly to our ringtones like old cellphones,right?
tom replied on Permalink
for step 2 you need to set your folder options so that the file extensions are shown. Right click file that you saved from email and under properties change extension to m4a then double click. worked perfectly for me. The trick is changing extension.
Irene Dean replied on Permalink
In the Tones folder my ringtones are grey. I have renamed them trimed them but still grey
Tole replied on Permalink
These instructions work perfectly well. Thanks a lot for this great tip.
Anonymous replied on Permalink
The instruction worked perfectly. Just follow step by step and it works. Thanks.
Star replied on Permalink
Works absolutely fine for me. Great job !!! but I have question usually voice notes have low volume how can I increase its volume when converting to ringtone?
CajunTex replied on Permalink
This worked perfectly on my Windows computer. These instructions are greatly appreciated!
Lunsford replied on Permalink
A bit complicated but it worked for me.
A Person replied on Permalink
This worked perfectly, thank you. Installing and updating iTunes took a while, but thank you for the instructions.
Qman replied on Permalink
Bs... Doesn't work goes straight to music in iTunes.. You can't just rename a file and boom it's changed has to be converted.. Lies all lies
Roger replied on Permalink
Worked for me
iphone 5s 8.3
Win7 pro SP1
Anonymous replied on Permalink
Thank you - worked fine, although I used dropbox rather than email - but to same effect.
Lessy replied on Permalink
Perfect! Had a little trouble figuring out how to change the file extension on my pc but once I figured that out (a simple checking of a checkbox lol) these steps worked perfectly! Thanks so much!
SN: I did have to save the file into my actual iTunes music folder because when I saved it to my desktop and tried to sync it, iTunes "couldn't locate" the file.
Maggie replied on Permalink
Thank you very much for the guidance worked first time!
Doni replied on Permalink
Worked for me! Thanks
Roxxlol21 replied on Permalink
I followed all the steps until you have to import to iTunes and I cannot find the file. I have renamed it and all but when I open ITunes I cannot find it
Pages